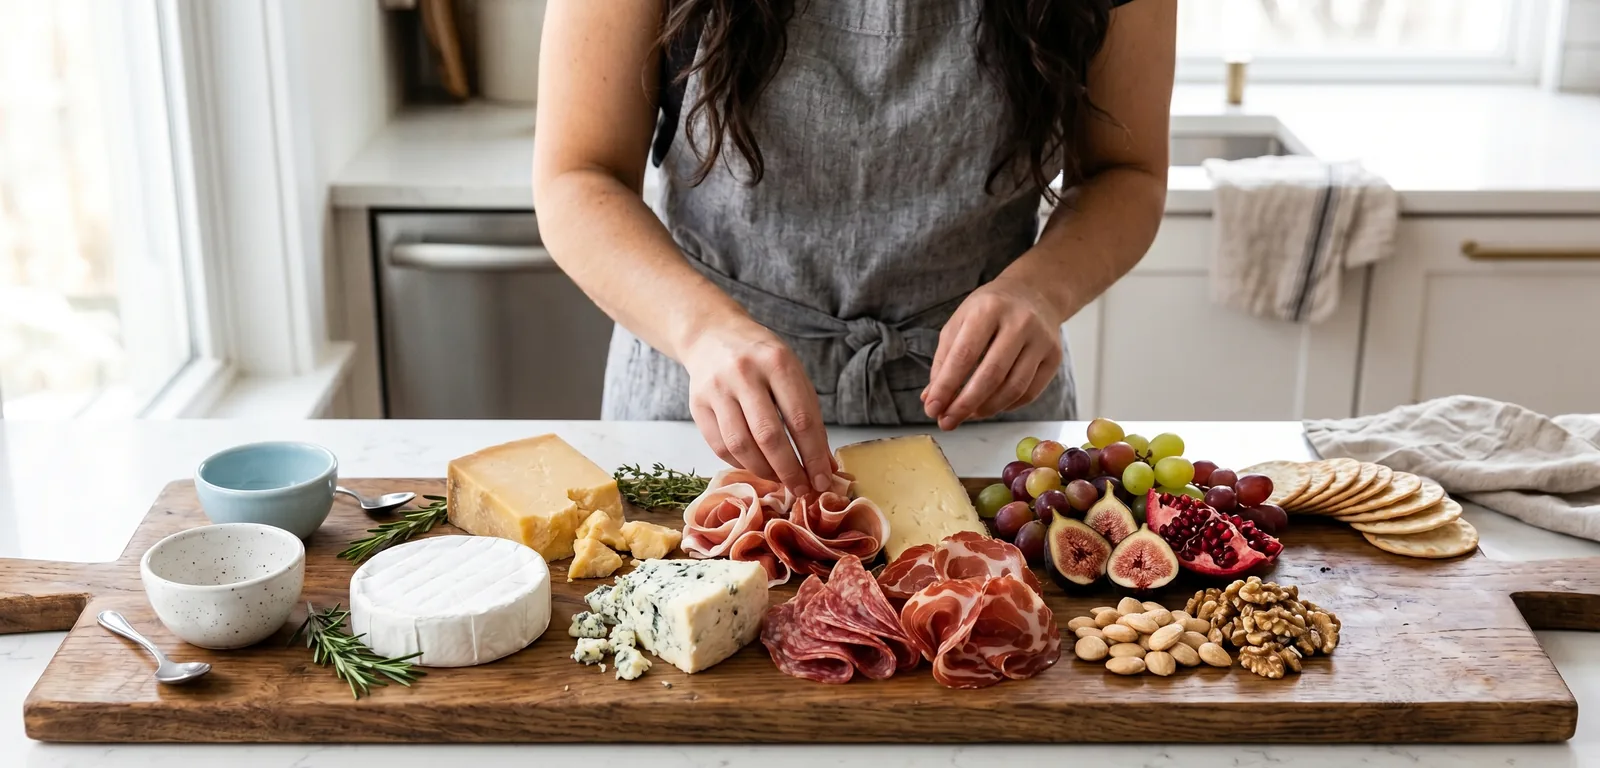
Quick Answer: Build in this order: 1) condiment bowls, 2) cheeses spread apart, 3) cured meats folded between them, 4) fruit in the gaps, 5) nuts and small fillers, 6) crackers within 30 minutes of serving so they stay crisp, and 7) garnish and a final temperature check.
Why Sequence Matters
A charcuterie board is a spatial puzzle. Every element has a size, a shape, and a structural role. Some elements are anchors that define zones. Others are flexible fillers that flow into gaps. Some elements need to stay cold and go on last. Others need to be placed early because they're immovable once set.
Getting the sequence right means the final board looks intentional — like you planned every placement. Getting it wrong means you end up with awkward gaps, elements crammed together, crackers that go soft because they sat too long, and condiment bowls you wish were somewhere else.
The sequence below works for boards ranging from a small slate for two to a full spread for twelve. The principles scale.
Step 1: Place Your Condiment Bowls First
Why first: Bowls are the most rigid, immovable elements on the board. They have fixed footprints and can't be adjusted once filled. Place them before anything else and position them as visual anchors — typically at corners, edges, or offset from center to create intentional asymmetry.
What goes in bowls: Honey, whole-grain mustard, fig jam, cornichons, olives, marcona almonds, dried fruit.
What goes wrong if you skip this: You place cheese and charcuterie, then realize you have nowhere sensible to put the honey. You either squeeze it into an awkward gap or place it at the edge where it looks like an afterthought.
Practical tip: For a standard rectangular board, two bowls in opposing corners creates natural zones. For a round board, one bowl slightly off-center forces a pleasing asymmetry.
Step 2: Place Your Cheeses
Why second: Cheese is the most visually dominant element on the board. Its placement defines the "zones" that everything else organizes around. Cheese also takes the longest to come to temperature — soft cheeses need 20–30 minutes at room temp, aged hard cheeses 45–60 minutes, so getting them on the board early serves a functional purpose too.
How to position: Aim for three cheeses of different shapes and textures. A round Brie in the center, a wedge of Gruyère at one end, a crumbled chunk of Manchego or aged Cheddar at the other creates visual variety without looking scattered.
Pre-cut or not: Score soft cheeses (Brie, chèvre) so the first guest doesn't have to commit the first cut. Leave aged hard cheeses intact or break off a chunk — the irregular edge signals "rustic and quality." Slice semi-firm cheeses (Manchego, Comté) partially to suggest the first move.
What goes wrong if you skip this step (or do it out of order): If you place cheese after charcuterie, you end up with the cheese in whatever space is left rather than in the position that creates the best visual anchor.
Step 3: Place Your Charcuterie
Why third: Charcuterie is flexible — thin, drapeable slices can fill curved spaces, nestle against cheese, or fan out in whatever direction you need. You want to place it after cheese so you can use charcuterie to bridge zones and create flow between the cheese anchors.
Folding technique by type:
- Prosciutto and coppa: Rosette fold. Lay slice flat, fold in half lengthwise, then gather into a loose rosette. Place petals-up so the layered edge catches light.
- Bresaola: Ribbon or loose cascade. Fold into a gentle S-curve and lean against cheese or the board edge.
- Salami: Quarter-moon (fold in half, then half again) or directly coin slices laid in a fan or shingled line.
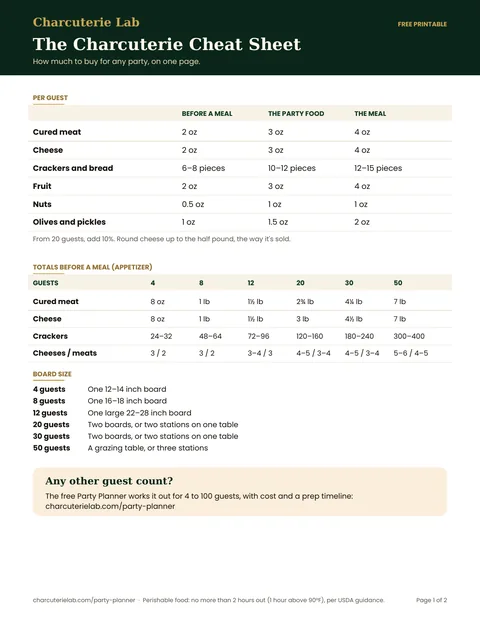
Quantity guide: 2 oz of charcuterie per person when a meal follows, 3 oz when the board is the party food. Three types is enough for variety without crowding.
What goes wrong if you skip this step's folding: Flat, unstacked slices look like deli packaging. Volume and dimension signal care and quality. A rosette from the same prosciutto looks like it belongs in a restaurant; a flat drape looks like it came straight from the bag.
Step 4: Add Fruit and Produce
Why fourth: Fresh fruit fills irregular gaps that rigid elements can't fill. Grapes can spill into any shape of space. Figs can be halved and leaned against cheese. Berries can fill corners. This step is where the board goes from "well-organized" to "lush."
Best choices by board:
- Grapes (green or red): Most versatile; cluster naturally; also provide the acid reset that cuts through fat — so position them near rich cheeses or charcuterie, not isolated in one corner.
- Fresh figs: Halve and place cut-side-up near aged cheese (especially blue or washed-rind) — the fruit sugar echoes the umami.
- Pear slices: Fan alongside Gorgonzola or Manchego.
- Apple slices: Position near aged Cheddar; classic pairing. Toss in lemon juice to prevent browning.
- Dried apricots or cranberries: If no fresh fruit is available; concentrate flavor means you need less.
Garnish here too: Fresh rosemary sprigs cost almost nothing and add color, height, and aroma. Thyme sprigs work similarly. Tuck them into gaps near cheese.
What goes wrong if you skip this step: The board looks like a protein platter, not a charcuterie board. Fruit is what separates a board from a meat-and-cheese plate.
Step 5: Fill Gaps with Nuts and Small Accompaniments
Why fifth: By now you have your major elements placed. There will be gaps — intentional or not. Nuts, extra dried fruit, cornichons pulled from their bowl, and extra olives are your gap-fillers. This is also where small condiments that don't need a bowl (fresh herbs, a dusting of honey over a cheese) get added.
Best gap-fillers: Marcona almonds, toasted hazelnuts, candied walnuts, dried cranberries, extra cornichons placed alongside fatty charcuterie.
The "no white space" principle: You want density. A sparse board reads as unfinished. If you can see bare board surface between elements, use nuts to bridge those spaces. The goal is a board that looks abundant.
What goes wrong if you skip this: Gaps make a full board look like it's running low. The density is part of the visual signal that the board is generous.
Step 6: Add Crackers Within 30 Minutes of Serving
Why last — and why timing matters: Crackers absorb moisture from fruit, cheese, and condiments. If placed too early, they soften and lose their structural integrity — which matters because crackers serve a textural role, not only a vehicle role. A soggy cracker against a creamy Brie is unpleasant.
The 30-minute rule: Add crackers no more than 30 minutes before guests arrive. If you're building in advance, leave the cracker positions empty and add them right before serving.
Cracker placement: Don't mix crackers into the board itself — they'll absorb moisture from everything around them. Create dedicated cracker zones: a fan along one edge of the board, a stack near the cheeses they're meant for, or a separate small board or tray alongside the main one.
Which crackers and where:
- Neutral water crackers: Near mild, creamy cheeses (Brie, chèvre, burrata)
- Seeded crispbreads: Near semi-firm cheese or charcuterie
- Rye crisps: Near smoked or funky cheeses (washed-rind, blue)
- Grissini: Stand upright in a small glass or lean against a bowl
What goes wrong if you skip the timing: Soft crackers are one of the most common complaints about charcuterie boards. It's entirely preventable with this one timing rule.
Step 7: Final Garnish and Temperature Check
The last pass: Walk the board visually before guests arrive. Look for: exposed board surface (fill with nuts or herbs), elements that have tipped over (reset rosettes), any cracker position that needs adjustment.
Temperature check: If you built the board more than 30 minutes before serving, the soft cheeses should be near room temperature now (ideal). Aged hard cheeses may need more time. If the board was in a cool environment, give everything a few extra minutes. Cold cheese mutes flavor significantly — the aromatic compounds that make Comté smell like hazelnuts don't volatilize properly below about 60°F.
One thing to do right before guests arrive: Drizzle honey directly over the aged hard cheese (not into the bowl). The contrast of the honey pooling in the natural texture of the cheese looks beautiful and signals how to eat it.
The Complete Sequence at a Glance
- Condiment bowls — place first, use as anchors
- Cheeses — define zones, allow to come to temperature
- Charcuterie — fold and drape to bridge zones
- Fruit and produce — fill gaps, add color, place near complementary pairings
- Nuts and small accompaniments — eliminate white space
- Crackers — within 30 minutes of serving only
- Final garnish and temperature check — rosemary, honey drizzle, visual pass
The sequence isn't complicated. But following it means every decision you make has space — you're not trying to find a spot for the honey after everything else is placed, or discovering too late that the Brie is in a corner where it's hard to reach. The build order is what makes the difference between a board that looks like it happened and a board that looks like it was designed.
Want to go deeper? See our guides on how to make a prosciutto rose, how to build a salami river, and the temperature guide for cheese and charcuterie. Sign up for the Charcuterie Lab Report for weekly technique breakdowns.
FAQ
Why does the order you build a charcuterie board matter?
Building in the right sequence prevents cramming and ensures every element gets enough space. If you place crackers first, you'll run out of room for cheese. If you place cheeses first, you establish anchors and can build organically around them. Sequence determines whether the board looks effortless or crowded.
What goes on a charcuterie board first?
Start with your largest elements: cheese blocks and small bowls. These are your anchors and they're hard to move once other food is around them. Once anchors are set, add folded or fanned meats, then fill gaps with crackers and smaller items like nuts, fruits, and garnishes last.
How do you prevent a charcuterie board from looking cluttered?
The number one rule is to leave small intentional gaps. A board that's 90% full looks abundant; a board that's 100% crammed looks chaotic. Use odd numbers of elements (3 cheeses, 5 sections) — odd groupings feel more natural to the eye than even-numbered arrangements.
Should crackers go on the board or on a separate plate?
Both work. Keeping some crackers off-board (on a side plate or bowl) lets guests replenish the board without disrupting the visual. On a large board with space, crackers fanned in a section look beautiful and stay dry. On smaller boards, side crackers preserve visual space for other elements.
How long does it take to build a charcuterie board?
A simple board for 2–4 people: 10–15 minutes. A medium board for 6–8 people: 20–30 minutes. A large spread for a crowd: 45–60 minutes. The time investment drops significantly with practice — the first few boards take longer as you find your rhythm.