How to Make a Salami River on Your Charcuterie Board
The salami river is one of those techniques that looks like it requires training but takes about five minutes to learn. Once you've done it once, you'll do it on every board — because it solves three problems simultaneously: it makes cured meats look visually dynamic instead of flat, it fills space efficiently, and it creates a natural winding path that guides the eye across the board.
It also photographs extraordinarily well. If you're posting your boards anywhere, this is the technique to know.
What Is a Salami River?
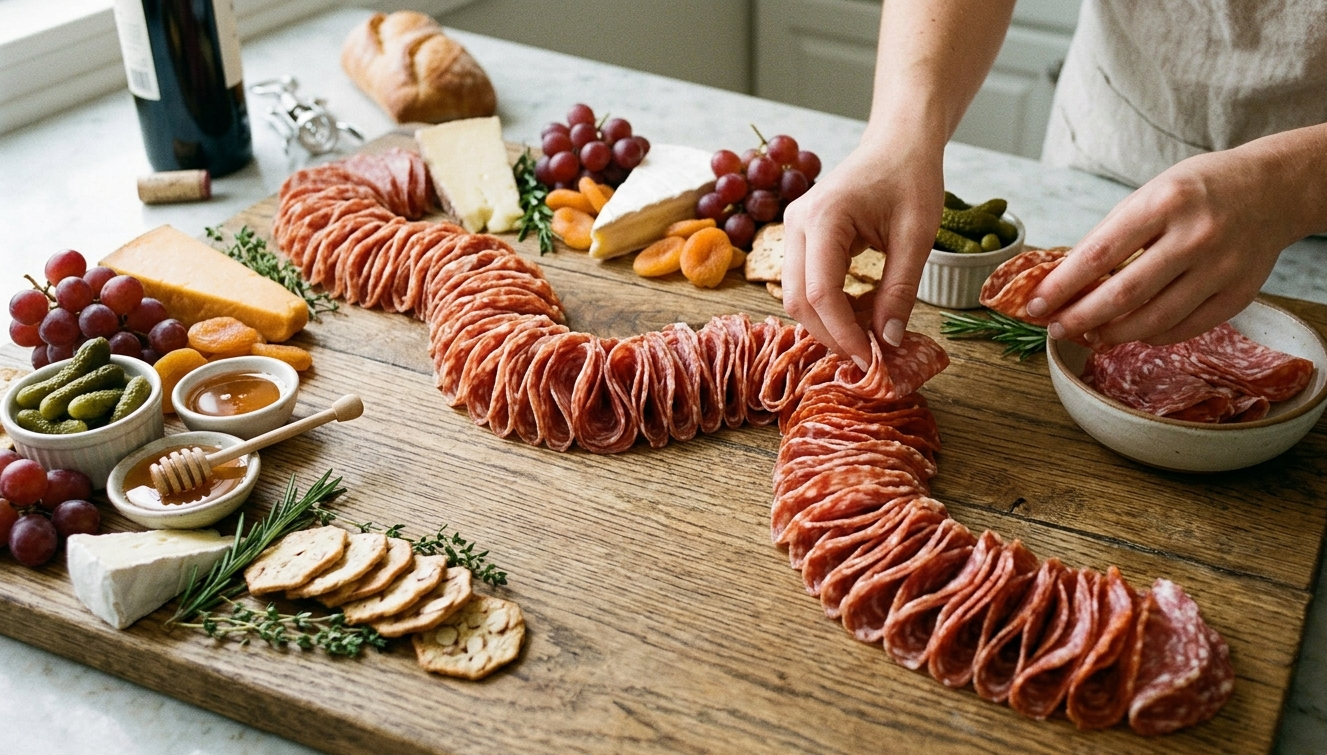
A salami river is a loosely folded, curving line of salami slices that snakes across the surface of a board, creating a winding "river" of meat. The individual slices are folded (usually in half or quarters) so they stand slightly upright and layer against each other, creating a rippled, textured appearance with visible depth rather than a flat stack of circles.
The technique works with any thinly-sliced cured meat that has enough pliability to hold a fold — salami, soppressata, coppa, bresaola. It works best with salami because of the slight rigidity of the casing and the even fat distribution that makes each slice hold its shape.
What You Need
Salami: The most important variable is slice thickness. You want slices between 2–3mm — thin enough to fold without cracking, thick enough to hold the fold and maintain some rigidity when stood up. Pre-packaged sliced salami works, but freshly sliced from a deli counter gives you more consistent thickness.
Your board: Any surface works. The river technique fills space most effectively on a medium-to-large board (12×18 inches or larger). On smaller boards, a shorter river or a mini river as an accent works well.
Optional: A pair of kitchen tongs or clean hands. The folding is done by hand — the fat in the salami is its own tack.
The Basic Technique: Step-by-Step
Step 1: Decide on the River's Path
Before you place a single slice, decide where the river will travel. A good salami river should curve naturally — it's a river, not a straight line. Think about the curve as flowing around other elements on the board, or as the dominant visual axis that other elements are arranged around.
For most boards: plan a gentle S-curve or a single curve running roughly from one third of the board to two thirds. The river shouldn't go corner to corner (too predictable) or take 90-degree turns (too artificial).
Step 2: Fold the First Slice
Pick up one slice of salami. Fold it in half, bringing two edges together so you have a half-moon shape. This is your foundational fold. Most salami rivers use this half-fold consistently — it's the fastest, most reliable method.
For more texture and height: fold the half-moon in half again to create a quarter-fold. Quarter-folded slices stand taller and create a more ruffled appearance. Useful if you want a more dramatic, layered look.
Step 3: Place the First Slice (Flat Edge Down)
Place the first folded slice with the straight/flat edge resting on the board, curved edge up. This is the foundation of the river. The flat edge is the anchor; the curved edge creates the visible ripple.
Step 4: Overlap and Continue
Place the next folded slice so it slightly overlaps the first — the back edge of the second slice resting against the front face of the first, approximately one-third of the way in. The overlap is what creates the river's depth and density. Too little overlap and you get a flat line; too much and the individual slices disappear into the mass.
Continue overlapping slices, following your planned curve. Each slice should lean slightly into the previous one, which creates the natural ripple.
Step 5: Navigate the Curve
When turning a corner or following a curve, rotate the placement angle of each slice incrementally. There's no sharp pivot — each slice is placed just slightly more angled than the last. Five to six slices is usually enough to navigate a gentle curve. For a tighter turn, use smaller incremental angles.
Step 6: Vary the Height (Optional)
For a more organic look, vary the height of some slices: some placed flat, some standing more upright, some slightly fanned open rather than crisply folded. A salami river where every slice is identical and perfectly consistent looks manufactured. Controlled irregularity looks artful.
Step 7: Tuck and Adjust
Once the river is complete, look at it from above (as it will be seen on the table). Tuck any stray slices, gently press down any fold that's collapsed, and fan open any slices that look too compressed. The goal is a flowing, layered look with visible depth — you should be able to see several layers of overlapping slices across the length of the river.
Variations
The double river: Two parallel rivers running side by side, slightly offset. Creates more visual mass and allows you to use two different meats side by side — Genoa salami and soppressata, for instance, creating a stripe effect.
The mini river: A short river (6–8 slices) used as an accent rather than a dominant feature. Useful for smaller boards or for adding a second meat without the full river treatment.
The coppa river: Coppa's marbled fat and slightly smaller diameter make rivers that look more intricate and colorful than salami. Use the same technique — coppa's natural fat tack is excellent for holding folds.
The bresaola fan: Bresaola is leaner and slightly less pliable than salami. For bresaola, use single half-folds and fan the slices slightly open at the top rather than pressing them tight — the lean meat tears if over-worked. The result is more like a fanned arrangement than a true river, but creates beautiful deep-red visual texture.
Where to Place the River on Your Board
The salami river works as either the dominant organizing structure of the board or as a flowing accent connecting other elements.
As the dominant structure: Build the river first, across the center or longest axis of the board. Then arrange cheeses, condiments, and accompaniments on either side, using the river as a dividing spine. Anchor each end of the river with a visual element — a small ramekin of condiment, a piece of cheese, a cluster of grapes.
As a flowing accent: Place major elements (cheese, serving dishes) first, then add the salami river as a winding connector between them. The river follows the gaps and contours of what's already there, giving the board an organic quality rather than a structured one.
Why It Works
Beyond aesthetics, the salami river solves a practical problem: thin-sliced salami laid flat in stacks becomes greasy and difficult to pick up cleanly, especially as it warms. The folded, standing presentation keeps each slice partially upright and distinct, making it easy for guests to take individual pieces without disturbing the whole arrangement. The river also stays looking good longer — flat stacks compress and pool oil; rivers maintain their form.