How to Make a Prosciutto Rose: The Step-by-Step Technique
A well-built charcuterie board has a hundred small decisions behind it — which cheeses to choose, how to balance flavors, where to place the condiments. But if there's one technique that transforms a good board into one that stops people in their tracks, it's the prosciutto rose.
It looks complicated. It isn't. Once you've made three or four of them, the folding becomes automatic — and the effect it creates is disproportionate to the effort required. This is the technique that earns you the comment "did you make this yourself?" every time.
What You Need
Prosciutto: Thinly sliced is essential. The thinner the slice, the more petal-like the rose will look. Pre-packaged prosciutto works, but freshly sliced from a deli counter gives you more control over thickness. Avoid prosciutto that's been sliced so thin it tears on contact — you need enough structural integrity to fold and hold a shape.
A wine glass or champagne flute: This is your mold. A standard wine glass with a 2–3 inch diameter opening works best. A champagne flute produces a tighter, more elongated rose. A wider glass produces something more like a peony. Experiment with what you have.
A flat surface: Clean cutting board or countertop.
Optional: A small sharp paring knife or kitchen scissors if you need to trim any stray edges.
The Technique: Step-by-Step
Step 1: Prepare Your Slices
Lay your prosciutto slices out flat. You'll use 3–4 slices per rose — one for the core, two or three for the outer petals. The core slice should be your least-perfect piece (inner folds aren't visible in the final product). Save your best, most intact slices for the outer petals.
Step 2: Make the Core
Take one slice of prosciutto and fold it loosely in half lengthwise, so the long edges meet but the slice isn't pressed flat — you want it to have a slight roll, like the center of a flower bud. Place this folded slice at the edge of the counter and begin rolling it into a loose cylinder, tucking the bottom edges under slightly as you roll. Don't roll it tight — the looser the core, the more natural the final rose will look.
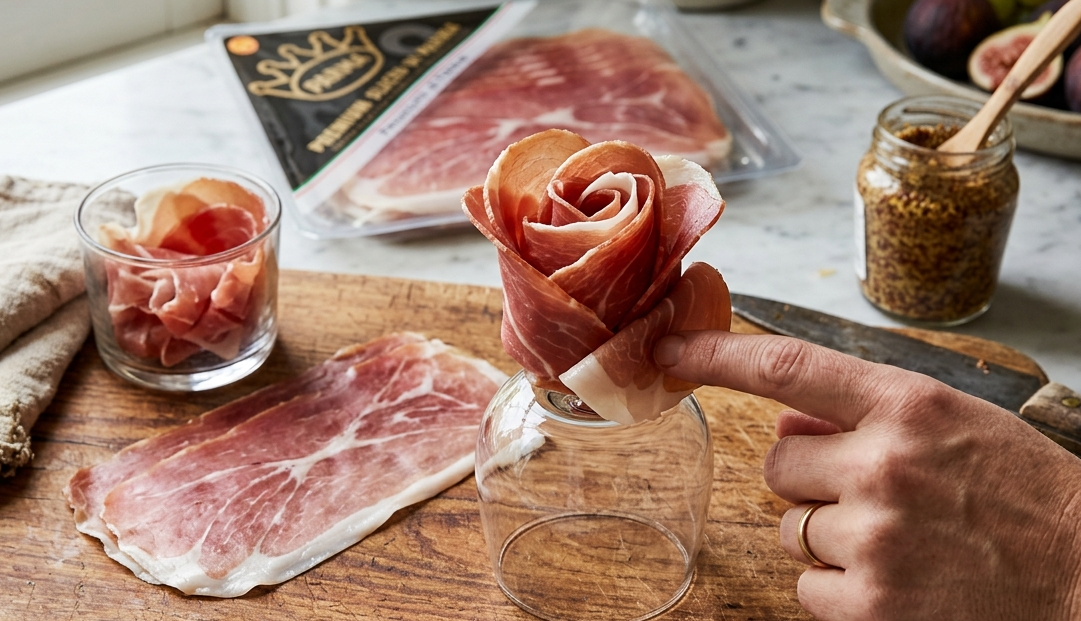
Step 3: Set the Core in the Glass
Hold the glass upside down over your work surface. Lower the rolled core into the glass opening, folded side down, so it sits loosely in the rim of the upside-down glass. The glass is now your scaffold — it holds the shape while you add petals.
Step 4: Add the First Petal Layer
Take a second slice of prosciutto. Drape it over the rim of the glass so it hangs down on one side like a petal, with roughly a third of the slice overhanging the outside of the glass and the rest inside against the core. Press it gently against the core to adhere (the fat in the prosciutto creates its own tack). Rotate the glass slightly and add a second slice in the same way, overlapping the first by about a third. Repeat with a third slice to complete the first petal ring.
Step 5: Add the Outer Petals (Optional)
For a fuller rose, add a second ring of petals the same way — three more slices, each draped over the rim and offset from the inner ring. The more petals you add, the more opulent the rose looks. Stop here if you want something elegant and tight. Add another ring if you want something dramatic and oversized.
Step 6: Compress and Release
Once all your petals are in place, hold the glass with one hand and use the other to gently press the petals against the core from outside. You're compressing the whole structure slightly so it holds together. Then, keeping that gentle pressure, flip the glass right-side-up. The rose should release from the glass and hold its shape on your hand. Transfer it to the board.
Step 7: Place on the Board
Set the rose on the board with the petals fanned upward and outward. Adjust any petals that shifted during transfer with a fingertip. The bottom of the rose will be flat from the glass, which keeps it stable on the board.
Troubleshooting
The rose is falling apart: Your slices are too thick, or you compressed too tightly and it's not holding tension. Try thinner slices, or add a small amount of overlap between the petals so they hold each other.
The petals are tearing: You're working with prosciutto that's too thin or too dry. Switch to a fresher package or deli-cut slices. Handle each piece as little as possible — body heat from your hands warms the fat and weakens the structure.
The rose looks flat, not dimensional: You're rolling the core too tightly. The core needs to be loose so there's something for the petals to spread around. Re-roll the core with less tension.
The rose collapses when transferred: Use the compression step before releasing from the glass. If it still collapses, let the rose sit in the glass for 30 seconds before transferring — the fat slightly firms up at room temperature and helps it hold.
Variations
The champagne flute rose: Use a narrower glass for a tighter, more cylindrical shape — more like a rosebud than a full bloom. This looks elegant on smaller boards or when space is limited.
The salami rose: The same technique works with thin-sliced salami. The result is slightly different — salami is stiffer than prosciutto, so the petals hold a sharper angle. Excellent for boards where prosciutto isn't the right meat choice.
The coppa or bresaola rose: Coppa's marbled fat makes for a rose with more color variation. Bresaola gives you a deeper, almost burgundy red. Both work with the same technique.
The doubled-petal rose: Instead of single slices as petals, fold each slice in half before draping it over the glass. This creates a denser, more layered look with each petal.
How to Use Roses on the Board
One prosciutto rose, placed at the center or at a visual focal point of the board, is typically enough. Two roses on opposite ends of a large board creates symmetry and frames the other elements. More than three roses on a single board starts to feel repetitive.
Surround the rose with complementary elements: a small dish of fig jam or honey directly adjacent (for the salt-sweet pairing), a few melon balls or sliced fresh figs tucked beside it, and crackers fanned out nearby. The rose draws the eye; the surrounding elements tell the guest how to eat it.
For the most visual impact: place the prosciutto rose as the first element on the board, then build everything else around it. It will anchor the entire composition.